How to Cutomize pageBlockTable Columns On The Fly in Your VF Pages?


A few days ago I can across a developer's post having difficulty customizing pageBlockTable columns on the fly. The fact is that pageBlockTable component is designed very flexible by nature and is quite powerful component.

In this article I will demonstrate how you can customize your columns and show to the user what is required to be shown. This is specially useful when creating reports.

Imagine we have a Visualforce page which views Opportunities' information with following characteristics:
  • Opportunity Name
  • Account Name
  • Opportunity Amount
  • Fixed Interest Amount (%25 of the Amount)
  • Opportunity Status (based on Close Date, if it is passed then "Closed" if not then "Open")
Let's look at the controller's code first. It is very straight forward, it has only one method:


public class myOppsController

{

private List<Opportunity> opportunities;

public List<Opportunity> getOpportunities()

{

opportunities = [Select Name, Amount, Account.Name, CloseDate from Opportunity];

return opportunities;

}

}


getOpportunities() property returns a list of Opportunities.
Note: for the simplicity of the example I did not put any conditions or limit in number of rows that we return. However, if you have more than 1000 Opportunity records then before running this code add some conditions or limits to the query.

Well, now let's take a moment to see what we need to be able to customize the view of the selected columns.


<apex:page controller="myOppsController" tabStyle="Opportunity">
<apex:form >
<apex:sectionHeader title="Opps List" />
<apex:pageBlock title="" id="pageBlock">
<apex:pageMessages ></apex:pageMessages>
<apex:pageBlockTable value="{!opportunities}" var="o" rendered="{!NOT(ISNULL(opportunities))}">
<apex:column value="{!o.Name}"></apex:column>
<apex:column value="{!o.Account.Name}"></apex:column>
<apex:column value="{!o.Amount}"></apex:column>
<apex:column >
<apex:facet name="header">Fix Interest</apex:facet>
{! o.Amount * 0.25 }
</apex:column>
<apex:column >
<apex:facet name="header">Status</apex:facet>
<div style="background-color:{!IF(o.CloseDate > TODAY(),'#7CFC00', '#FFA07A')}">
{!IF(o.CloseDate > TODAY(),'Open', 'Closed')}
</div>
</apex:column>

</apex:pageBlockTable>
</apex:pageBlock>
</apex:form>
</apex:page>


As you can see in the above code by using the putting a template in the body of the apex:Column component you can actually go free style!

Testing Your Controller Extentions


In a previous post I pointed it out how you can get good test coverage when deploying your VF pages. Since then many readers asked me about deploying VF pages with Controller Extensions.

In concept they are the same and the test is done with the same approach!

In this article I will show you how similar the Custom Controllers and Controller Extensions are. Very simple but maybe with a little twist!

Let's imagine that we have a Visualforce Page that extends the standard controller "Contact".

Here is how the page looks like:

<apex:page standardController="Contact" extensions="myControllerExtention">
<apex:form >
<apex:detail id="contactDetail" />
</apex:form>
</apex:page>


Very simple page, so when the page is viewed the URL will be like:
https://cs2.salesforce.com/apex/mypage?id=003200000005LaO

Where id parameter will be a contact's id and the user will see a page the same as Contact's detail page.

The controller looks like this:


public class myControllerExtention {

private Contact con;

public myControllerExtention(ApexPages.StandardController stdController)

{

this.con = (Contact)stdController.getRecord();

}

public string GetContactName()

{

return con.Name;

}

}


And now is the time we developed the Tester class.

The tester class should implement a method that creates an instance of the Contact controller and then pass that controller to the Constructor of our Extension class. That's it, the rest is the same as testing Custom controllers.


public class testMyPage {

static testMethod void myPage_Test()

{

//Test converage for the myPage visualforce page

PageReference pageRef = Page.MyPage;

Test.setCurrentPageReference(pageRef);

Account newAccount = new Account (name='XYZ Organization');

insert newAccount;

//create first contact

Contact myContact = new Contact (FirstName='Joe',

LastName='Schmoe',

AccountId=newAccount.id);

insert myContact;

ApexPages.StandardController sc = new ApexPages.standardController(myContact);

// create an instance of the controller

myControllerExtention myPageCon = new myControllerExtention(sc);

//try calling methods/properties of the controller in all possible scenarios

// to get the best coverage.

string ConName = myPageCon.GetContactName();

}

}


Happy coding!

How to Dynamically Change actionStatus Content? - Part II

In part I of this article we explored what components we will need to be able to dynamically view actionStatus based on different actions that takes place the Visualforce page.

Now lets piece the page components together and see how we can have a javascript function which changes the actionStatus start facet's content on the fly and calls a controller's method as well.


<apex:page controller="myPageController" tabStyle="Account">
<apex:form >
<apex:sectionHeader title="My Page" />
<apex:pageBlock title="" id="pageBlock">
<apex:pageBlockButtons location="top">
<apex:inputField id="accountType" value="{!Account.Type}" />
<apex:commandButton value="View" action="{!ViewAccounts}" id="theButton" rerender="pageBlock"></apex:commandButton>
</apex:pageBlockButtons>
<apex:pageMessages ></apex:pageMessages>
<!-- defines a javascript function which calls a Controller's method -->
<apex:actionFunction action="{!ShowSelected}" name="RowMethodCall" rerender="pageBlock" status="status">
<apex:param name="selectedAccount" assignTo="{!selectedAccount}" value=""/>
</apex:actionFunction>
<!-- define a start facet within the actionStatus that has a div with defined id visible to the whole HTML document -->
<apex:actionStatus id="status">
<apex:facet name="start">
<div id="statusTemplate">Working...</div>
</apex:facet>
</apex:actionStatus>

<apex:pageBlockTable value="{!accounts}" var="a" rendered="{!NOT(ISNULL(accounts))}">
<apex:column >
<apex:facet name="header">Account Name</apex:facet>
<apex:outputLink value="/{!a.Id}" target="_blank">{!a.Name}</apex:outputLink>
</apex:column>
<apex:column value="{!a.type}"></apex:column>
<apex:column >
<apex:facet name="header">Action</apex:facet>
<a href="javascript:DoTask('{!a.Id}');">Execute</a>
<div style="display:none" id="{!a.Id}">
Processing {!a.Name} ...
</div>
</apex:column>
</apex:pageBlockTable>
</apex:pageBlock>
<script type="text/javascript">
function DoTask(accountId)
{

var accountStatus = document.getElementById(accountId);
if (accountStatus && accountStatus.innerHTML)
{
document.getElementById('statusTemplate').innerHTML = accountStatus.innerHTML;
}

RowMethodCall(accountId);
}
</script>
</apex:form>
</apex:page>

As you can see in the code use of actionFunction component allows us to define a javascript function which can be called from the client-side (user's browser) to safely call a controller's method. I called the function name for this exmaple: "RowMethodCall" which will use the page message to show the selected Account Name to the user.

This function needs the selected Account ID as a parameter to be able to show the seleced account.

The Action column in the pageBlockTable component calls another javascript function called: "DoTask". DoTask also receive the account Id as a parameter and here is the trick:

Since account Ids are unique, I named the Id of the Div element equal to the Account id (which will contain a template that we are suppose to show as cutom actionStatus for each Account).

This way DoTask javascript function will be able to read the innerHTML content of the div in the action column and apply to the content of the actionStatus start facet div element.

Well, and now if you wondered how the custom controller is like, here you go:


public class myPageController {

private Account acc = new Account();

private List<Account> accs;

private string selectedAccount;

public Account getAccount()

{

return acc;

}

public void setAccount(Account a)

{

acc = a;

}

public List<Account> getAccounts()

{

return accs;

}

public string getSelectedAccount()

{

return selectedAccount;

}

public void setSelectedAccount(string value)

{

selectedAccount = value;

}

public PageReference ViewAccounts()

{

if (acc.Type == null)

{

//view a message because validation has failed.

ApexPages.addmessage(new ApexPages.message(ApexPages.severity.INFO,'Validation Failed: Select an item fron the dropdown list.'));

return null;

}

string AccountType = acc.Type;

accs = [Select id, name, type from Account where type= :AccountType limit 20];

if (accs == null || accs.size() == 0)

{

ApexPages.addmessage(new ApexPages.message(ApexPages.severity.INFO,'No data found to be shown.'));

}

return null;

}

public PageReference ShowSelected()

{

if (selectedAccount != null && selectedAccount != '')

{

for(Account a: accs)

{

if (a.Id == selectedAccount)

{

string Msg = a.Name + ' Account is selected.';

ApexPages.addmessage(new ApexPages.message(ApexPages.severity.INFO,Msg ));

}

}

}

return null;

}

}


How to Dynamically Change actionStatus Content? - Part I

Nowadays many Salesforce developers employ the powerful Visualforce framework to create richer and more complex applications. The framework itself might not as flexible or as elaborate in terms of offerings however combining it with client-side programming features (DOM model and javascript) you actually can do interesting things!

In this article I will show you how you can work around the basic actionStatus limitations and show dynamic content in actionStatus depend on what action is being triggered on the page.

Let's say that we want to create a page with following characteristics:
  • The page filters Accounts records based on Account Type and view the records to user via pageBlockTable
  • One column of the shown table has a link "Action" which when clicked on a controller's method will be called via javascript.
  • Meanwhile, the actionStatus will show a message like: Processing {Account.Name} ... (Neat ehh!). The message can be combined with any HTML code (for each row in the table) to enhance the view of the actionStatus

Now let's look a bit further into what we need to put together in the page to accomplish the above:
  • I will need an InputField component to be hooked up with Account's picklist "Type".
  • Also a commandButton to call a method of the Controller and view the results on the pageBlockTable
  • The pageBlockTable will have Account Name, Type and Action columns. Action column will have a facet in which we will do our trick! The facet should do the following:
  1. It will have a hyperlink which calls a javascript function once clicked on.
  2. Also it will have a hidden div which will contain the HTML template we need to show in actionStatus once the link is clicked on!
But how exactly a javascript function can change the content of start or stop facets of actionStatus and how it will trigger the methods of the Custom Controller?

You will see all these in the next page.

Getting Good Test Coverage on VF Pages


Once the development phase of your new Visualforce page is finished often many find it a challenge to receive the acceptable code coverage needed to be obtained in order to transport the changes into production instance of Sales force.

Below is a sample of how you can create a test class that will take care of it! This is going to be really interesting...

First i will show you the visual force page and the controller behind it.
What this page does is to simply filter the Account records by their type (picklist) and show them to the user.


Here is the source code for the Visualforce page and its controller:


<apex:page controller="myPageController" tabStyle="Account">
<apex:form >
<apex:sectionHeader title="My Page" />
<apex:pageBlock title="" id="pageBlock">
<apex:pageBlockButtons location="top">
<apex:inputField id="accountType" value="{!Account.Type}" />
<apex:commandButton value="View" action="{!ViewAccounts}" id="theButton" rerender="pageBlock"></apex:commandButton>
</apex:pageBlockButtons>
<apex:pageMessages ></apex:pageMessages>
<apex:pageBlockTable value="{!accounts}" var="a" rendered="{!NOT(ISNULL(accounts))}">
<apex:column >
<apex:facet name="header">Account Name</apex:facet>
<apex:outputLink value="/{!a.Id}" target="_blank">{!a.Name}</apex:outputLink>
</apex:column>
<apex:column value="{!a.type}"></apex:column>
</apex:pageBlockTable>
</apex:pageBlock>
</apex:form>
</apex:page>


and now the code for the Controller class:

public class myPageController {

private Account acc = new Account();

private List<Account> accs;

public Account getAccount()

{

return acc;

}

public void setAccount(Account a)

{

acc = a;

}

public List<Account> getAccounts()

{

return accs;

}

public PageReference ViewAccounts()

{

if (acc.Type == null)

{

//view a message because validation has failed.

ApexPages.addmessage(new ApexPages.message(ApexPages.severity.INFO,'Validation Failed: Select an item fron the dropdown list.'));

return null;

}

string AccountType = acc.Type;

accs = [Select id, name, type from Account where type= :AccountType limit 20];

if (accs == null || accs.size() == 0)

{

ApexPages.addmessage(new ApexPages.message(ApexPages.severity.INFO,'No data found to be shown.'));

}

return null;

}

}


Now it is the moment! The most important part: the tester class.
In order to get a the best results following things should be included in your test method:
  • Create a reference to your page and set the Test object's current reference to your page (shown below)
  • Create a new instance of your controller (if you are using a Custom Controller or Extension)
  • Consider all possible scenarios (Test Cases) and try calling all properties and methods of your controller (Demonstrated below)


public class testMyPage {

static testMethod void myPage_Test()

{

//Test converage for the myPage visualforce page

PageReference pageRef = Page.MyPage;

Test.setCurrentPageReference(pageRef);

// create an instance of the controller

myPageController myPageCon = new myPageController();

//try calling methods/properties of the controller in all possible scenarios

// to get the best coverage.

Account pAccount = myPageCon.getAccount();

//test when type == null

myPageCon.viewAccounts();

//test when type = 'undefinedType'

pAccount.Type = 'other';

myPageCon.setAccount(pAccount);

myPageCon.viewAccounts();

// test when having results

pAccount.Type = 'Customer';

myPageCon.setAccount(pAccount);

myPageCon.viewAccounts();

myPageCon.getAccounts();

}

}


How to create a Google Map S-Control?


In many cases you may need to create a control that utilizes the Google Map APIs to show location of a client, client's offices, driving directions, etc to the user.

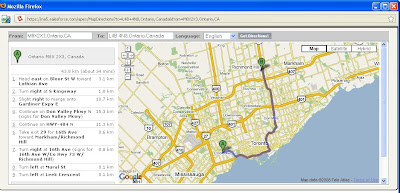
In this example, I will demonstrate how you can develop a s-control to show driving directions from the User's location to any Account that the User is viewing.

In order to accomplish this I initially thought of a Visualforce Page which hosts the Google Map API and I could use the all-ready standard components with original Salesforce look and feel.

So I tried and I tired and did not seem to get anywhere since Google was not recognizing my key, so Google's authentication for my website let's say: http://na5.salesforce.com/ would fail each time I tried to view my VF page. Finally I decided to do this in a S-Control and then call the S-Control in VF page.

If you need more information about how you can call a S-Control in your VF pages click here.

So first let's see what we want to achieve:
The S-Control reads the URL parameters and looks for two parameters to be passed to it:
  • from: the location where the sales rep (user) is located.
  • to: The target location, could be the Account's address
Once the S-Control is called and the two parameters passed via URL, the S-Control then in turn calls Google's APIs to view the map and show the directions information.

Now let's first create a new S-Control:
  1. Click on "Setup" which is located on the top right corner of the force.com page.
  2. Expand "Develop" item and click on "S-Controls"
  3. Hit "New Custom S-Control"
  4. Provide a Label "Map Directions" and a description is you wished to
  5. The Type should be HTML since we want to create a HTML, Google API mash up
  6. Now it is time to enter the code for the S-Control


<html xmlns="http://www.w3.org/1999/xhtml" xmlns:v="urn:schemas-microsoft-com:vml">
<head>
<meta http-equiv="content-type" content="text/html; charset=utf-8" />
<title>Google Maps JavaScript API Example: Advanced Directions</title>
<link href="/dCSS/Theme2/default/common.css" type="text/css" media="handheld,print,projection,screen,tty,tv"
rel="stylesheet">
<link href="/dCSS/Theme2/default/custom.css" type="text/css" media="handheld,print,projection,screen,tty,tv"
rel="stylesheet">

<script src=" http://maps.google.com/?file=api&amp;v=2.x&amp;key={YOUR KEY}"
type="text/javascript"></script>

<script src="/js/functions.js" type="text/javascript"></script>

<script type="text/javascript" src="/soap/ajax/13.0/connection.js"></script>

<style type="text/css">
body {
font-family: Verdana, Arial, sans serif;
font-size: 11px;
margin: 2px;
}
table.directions th {
background-color:#EEEEEE;
}

img {
color: #000000;
}
</style>

<script type="text/javascript">

var map;
var gdir;
var geocoder = null;
var addressMarker;
var dirFrom = '{!$Request.from}';
var dirTo = '{!$Request.to}';
var mapLocale = ""
var SControlID = '{!$Request.lid}';
var SFrameIC = '{!$Request.ic}';


function initValues()
{
mapLocale = "en_US";

setInputFields(dirFrom,dirTo);
}

function setInputFields(from, to)
{
window.document.getElementById("fromAddress").value = from;
window.document.getElementById("toAddress").value = to;
}


function initialize()
{
initValues();

if (GBrowserIsCompatible()) {
map = new GMap2(document.getElementById("map_canvas"));
map.addControl(new GSmallMapControl());
map.addControl(new GMapTypeControl());
gdir = new GDirections(map, document.getElementById("directions"));
GEvent.addListener(gdir, "load", onGDirectionsLoad);
GEvent.addListener(gdir, "error", handleErrors);

setDirections(dirFrom, dirTo, mapLocale);
}
}

function setDirections(fromAddress, toAddress, locale) {
if ((fromAddress) && (toAddress))
gdir.load("from: " + fromAddress + " to: " + toAddress,
{ "locale": locale });
}

function handleErrors()
{
if (gdir.getStatus().code == G_GEO_UNKNOWN_ADDRESS)
alert("No corresponding geographic location could be found for one of the specified addresses. This may be due to the fact that the address is relatively new, or it may be incorrect.\nError code: " + gdir.getStatus().code);
else if (gdir.getStatus().code == G_GEO_SERVER_ERROR)
alert("A geocoding or directions request could not be successfully processed, yet the exact reason for the failure is not known.\n Error code: " + gdir.getStatus().code);

else if (gdir.getStatus().code == G_GEO_MISSING_QUERY)
alert("The HTTP q parameter was either missing or had no value. For geocoder requests, this means that an empty address was specified as input. For directions requests, this means that no query was specified in the input.\n Error code: " + gdir.getStatus().code);

// else if (gdir.getStatus().code == G_UNAVAILABLE_ADDRESS) <--- Doc bug... this is either not defined, or Doc is wrong
// alert("The geocode for the given address or the route for the given directions query cannot be returned due to legal or contractual reasons.\n Error code: " + gdir.getStatus().code);

else if (gdir.getStatus().code == G_GEO_BAD_KEY)
alert("The given key is either invalid or does not match the domain for which it was given. \n Error code: " + gdir.getStatus().code);

else if (gdir.getStatus().code == G_GEO_BAD_REQUEST)
alert("A directions request could not be successfully parsed.\n Error code: " + gdir.getStatus().code);

else alert("An unknown error occurred.");

}

function onGDirectionsLoad(){
// Use this function to access information about the latest load()
// results.

// e.g.
// document.getElementById("getStatus").innerHTML = gdir.getStatus().code;
// and yada yada yada...
}
</script>

</head>
<body onload="initialize()" onunload="GUnload()">
<div style="background-color: #CCCCCC">
<form action="#" onsubmit="setDirections(this.from.value, this.to.value, this.locale.value); return false">
<table>
<tr>
<th align="right">
From:&nbsp;</th>
<td>
<input type="text" size="25" id="fromAddress" name="from" value="" /></td>
<th align="right">
&nbsp;&nbsp;To:&nbsp;</th>
<td align="right">
<input type="text" size="25" id="toAddress" name="to" value="" /></td>
<th align="right">
Language:&nbsp;</th>
<th align="right">
<select id="locale" name="locale">
<option value="en" selected="selected">English</option>
<option value="fr">French</option>
<option value="de">German</option>
<option value="ja">Japanese</option>
<option value="es">Spanish</option>
</select>
</th>
<td>
<input name="submit" type="submit" value="Get Directions!" class="button" /></td>
</tr>
</table>
</form>
</div>
<div style="border-width: 1px; border-color: #000000; border-style: solid;">
<div style="overflow: auto; width: 99.5%; height: 380px">
<table class="directions" style="width: 100%; height: 100%">
<tr>
<td valign="top" style="width: 275px;">
<div id="directions" style="width: 275px; background-color: #ffffff;">
</div>
</td>
<td valign="top">
<div id="map_canvas" style="width: 100%; height: 375px; background-color: #ffffff;">
</div>
</td>
</tr>
</table>
</div>
</div>
</body>
</html>


If you would like to know how you can add your VF page which contains the S-Control to your Account's page click here.

How add a detail button to your Objects?

Let's imagine that we have a VF page which receive two address URL parameters (From and T0) and show us the driving direction from the "from" address to the "to" address.

Using the page we want to add a detail button to Sales Force Account object called "Driving Direction" and once the Sales Rep click on this button can actually view the driving directions from his office to the client's (Account's) location.

Neat, ha?

So, this is how we go about and do this:

  1. Go to "Setup" page (link located on the top right corner of the page)
  2. Under the "App Setup" expand the "Customize" item
  3. Find Account object and expand it
  4. Click on "Buttons and Links"
  5. On the "Custom Links and Buttons" section click on "New"
  6. Enter Label, Name, Description and Select "Detail Page Button" as type
  7. Behavior="Display in new Window" and Content source="URL"
  8. Let's imagine that your VF page name is "MapDirections". Then enter the following code into content of the button:


/apex/MapDirections?to={!Account.BillingPostalCode},{!Account.BillingState},{!Account.BillingCountry}&from={!$User.PostalCode},{!$User.State},{!$User.Country}

The above text includes a combination of a URL text and a few tags which later on will be replaced with actual data.

Generally tags follow this format: {!field-name} . You can easily see what field types and field names are available to you using the two dropdown lists provided by Sales Force.

And with this we are done with creating the Detail button however we won't be able to see it on the Account's detail page before we add it into the Account's Layout.

In order to add the button to the Account's layout:
  1. Go to: Customize -> Accounts --> Page Layouts
  2. Edit any or all page layout on which the Custom Button should be visible
  3. Once you click on "Edit" layout button you can view the Account's layout page
  4. On the "Button Section" double click on "Detail Buttons"
  5. A new window opens up, look at the "Custom Buttons" section your button must be listed there.
  6. Add the button to the "Selected Buttons" list and click on.
  7. Save the Layout and now you will be able to see your button as it is depicted below:

How to host a S-Control in your Visualforce Pages?

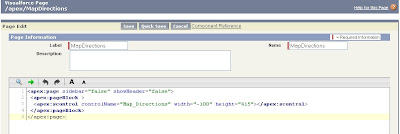
In order to host your s-control in your Visual Force Pages you need to the the following steps:

  1. Create a new VF page or go to your existing VF page editor
  2. Pick your S-Control API name and have it ready.
  3. Within the Page block or where you find suitable add an apex:scontrol tab as follows:


<apex:scontrol controlName="Map_Directions" width="-100" height="415"> </apex:scontrol>

Notice that your controlName should be your S-Control's API name and this something interesting I found out, if you wish your S-control to be aligned horizontally to 100% of the page's width then you need to set the "width" attribute to "-100" !

Later on I will show you, how can you luanch your VP Page with your S-Control on it from a detail button.

Happy coding!


How do custom validations in Visualforce Pages?

Implementing validation in Visual Force pages can be tricky as times because individual field support a "required" behavior while you may need something something much more complex than that.

In fact in order for you to be able to validate the data you may need to put of a whole block of code to support it.

Here is how you can add data validation into your Visual Force pages:

1) In order to be able to support this requirement you either need to create a new Controller or extend an existing one.

2) Find out on what events (button click, etc) you need to carry out validation.

3) Write an Apex method for your controller "IsValid" which returns a boolean value indicating whether the validation was successful or not.

4) Put your validation logic in that method and call this method in the chosen events such as button clicks, etc.

Below is as example you can easily test on your own SalesForce Developer portal and learn more:


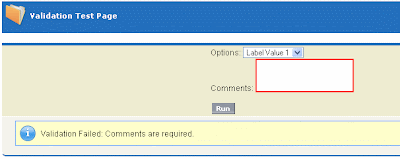
In this example, only when user selects the last value of the list is not required to provide "Comments" otherwise "Comments" are mandatory!


Visual Force Page Markup Code:


<apex:page controller="ValidationFormPageController" tabStyle="Account">
<apex:sectionHeader title="Validation Test Page"></apex:sectionHeader>
<apex:form >
<apex:pageBlock title="" id="pageBlock">
<apex:pageBlockButtons location="top">
<apex:outputLabel value="Options: " for="chooseView"></apex:outputLabel>
<apex:selectList id="chooseView" value="{!selectedValue}" size="1">
<apex:selectOption itemValue="Value1" itemLabel="Label Value 1"></apex:selectOption>
<apex:selectOption itemValue="Value2" itemLabel="Label Value 2"></apex:selectOption>
<apex:selectOption itemValue="Value3" itemLabel="Label Value 3"></apex:selectOption>
</apex:selectList><br/>
<apex:outputLabel value="Comments: " for="theTextArea"></apex:outputLabel>
<apex:inputTextarea id="theTextArea" value="{!inputTextValue}" style="{!textAreaStyle}" ></apex:inputTextarea><br/><br/>
<apex:commandButton value="Run" action="{!Run}" id="theButton" rerender="pageBlock"></apex:commandButton>
</apex:pageBlockButtons>
<apex:pageMessages ></apex:pageMessages>
</apex:pageBlock>
</apex:form>
</apex:page>


Visual Force Page Markup Code:


public class ValidationFormPageController {

private string textAreaStyle = '';

private string selected_Value = 'Value1';

private string inputTextValue = '';

public string getSelectedValue()

{

return selected_Value;

}

public void setSelectedValue(String value)

{

selected_Value = value;

}

public string getInputTextValue()

{

return inputTextValue;

}

public void setInputTextValue(string Value)

{

inputTextValue = Value;

}

public string getTextAreaStyle()

{

return textAreaStyle ;

}

public PageReference Run() {

if (!isValid())

{

//what to show when the data is not valid:

ApexPages.addmessage(new ApexPages.message(ApexPages.severity.INFO,'Validation Failed: Comments are required.'));

textAreaStyle = 'border-size:2px; border-color:red;border-style:solid;';

return null;

}

else

{

// things to do when data is valid.

textAreaStyle = '';

}

//The rest of your logic

return null;

}

private Boolean isValid()

{

// this method is called to validate the data entered by user.

if (selected_Value != 'Value3')

{

if (inputTextValue == '')

return false;

else

return true;

}

else

return true;

}

}